Showing posts with label How to Web. Show all posts

Sep 16, 2013

How is bounce rate calculated?

How is bounce rate calculated?
First off, what is bounce rate? Google’s support pages have provided a very nice and crisp definition about bounce rate, 

“It is the percentage of single page visits in which a visitor leaves your website from the landing page”


Now how important is bounce rate to you? If you have a small business or a passion website containing few webpages then visitors bouncing off from your website will not have much effect because you have a few webpages only (What do you expect, The people will just hang around for a while?). 

But if you’re a professional blogger or have a business website containing many pages, bounce rate might just start to be a headache for you. For a large website you might have a high page rank and hundreds of pages with a book worth of content. But if the visitor does not read them, what use is the content anyway?

Looking carefully, for any professional website, the bounce rate threshold must be set to 40-60%, which of-course is a really tough target. If your bounce rate is less than 40% then you’re going in the right direction. But the moment it crosses a threshold you must understand something is not right. It is your SEO techniques, content or your keyword tactics or some others.

Let us understand how is the bounce rate is calculated. Let us suppose, 10 visitors landed on your site and 4 people left the page. So the bounce rate will be calculated as (4/10)x100=40%, so you will have a bounce rate of 40%, which is acceptable of course but can always be improved upon.

How is bounce rate calculated, formula

To know if your bounce rate is good enough read a previous article on the range of values your bounce rate might fall in, depending on the type of website you own.

If you have a high bounce rate, never be disheartened, there are 4 sure shot ways of improving your bounce rate. That too in just minutes.

This answered,
mohitchar How is bounce rate calculated?

Aug 30, 2013

How do you report a person on Twitter

How do you report a person on Twitter Front
Following the footsteps of facebook, pinterest and google+, Twitter too has started its new service known as report abuse. Though the feature of report abuse had already been started in the iOS app, twitter has now officially started the service on the desktop version. 

The move was made by the micro-blogging site after it witnessed a surge of users demanding the option. This came after two journalists India Knight and Laurie Penny received death threats on twitter. Tony wang, the General Manager of Twitter UK, agreed that the threat was “Simply Unacceptable”. 
When you report a person, what happens?
When a person goes on to report a user or a tweet, he/she is greeted by a large fonted message, 

“I am reporting an abusive user.”

The abuse section on the support page deals with three kinds, 
  1. If someone on twitter is posting a person’e private information
  2. If someone on twitter is being abusive
  3. If someone is sending a person violent threats.

TwitterTwitter’s own article against abusive behavior enlists some points which can help users understand the situation better.

The micro-blogging website urges users to first understand twitter and what it does. Next it wants us to consider the context and goes on to explain that the individual tweets can be confusing and it is possible the tweet you consider offensive might be a part of a long conversation. Try to understand the history of your tweets, which people stopped following you suddenly etc.

Also the support page urges users to think before they tweet and if they find someone or something offensive, They are always welcome to block the person and ignore the tweet.

But what should you do when the situation has gone too far?
Twitter recommends you to reach out to the people you trust. Talk to them about the situation and make them understand the gravity of the situation. Certain websites would help,

If you need Step by step process of reporting a person to twitter, You can look at the report by Stop cyber bullying

"This article is dedicated towards bullied innocents who now have something to smile at."


This was all about 
How do you report a person on Twitter MohitChar

Aug 5, 2013

4 Concepts to Convert your Website into an App

4 Concepts to Convert your Website into an App front
The previous article spewed fire on the need for having an app for your precious website. Here we'll discuss the concepts you can use to create a new app from your already functioning website. According to data from mobithinking, currently 1.3 billion consumers are using android, this figure is expected to rise to 4.4 billion by 2017. As per Neilson report, huge number of people are now shifting towards mobile smartphones. An april Google Survey, show that people preffer mobile web than websites. 56 billion smartphone apps will be downloaded in the year 2013 as per ABI Reseach. Portio Research, however suggests that the revenue from app downloaded will increase to 64.5 billion in 2017. Now that you are on my side in creating an app, lets widen your horizon and see the different types of apps you can create. Lets have the four types of apps web developers always want for conversion.

Number image concepts
The Functional App
A re-directional app on the other-hand, functions in a completely different way. For an app, the user just has to toil for once, i.e. during the installation of the app. 
After that, the person just has to click on the app in his phone and boom! your website, his smartphone, a match made in heavens. Regarding the concept  an app is usually known for its functionality. A website however is not. 

You can actually use your app to practically pull the users towards your website, confused? lets have an example, A very apt example for fitness lovers is an app called micoach at adidas. The app tracks your movements as you go jogging or walking or running with the help of gps on your phone.. Finally after the workout, the app give you the distance traveled, calories burnt and even speed. In a nutshell it is a complete app. but there is a facility of scheduling workouts in the app, . i.e. you can create  a schedule on which days you would plan to run and which days you would rather work on strength training. However the function can used only after you sign-up on the website. That would mean the visitors will have to visit the website and look at other functionality available, glance through their blogs indulge in forums and meet new people (See how the possibilities unfold)

micoach screenshot


Number image concepts 2A. Website Redirection Type App
Other than a functional app which obviously provides a service, you can always go for the simple website redirection app. which opens a separate platform for viewing your website that too without opening the browser. This is applicable for podcast based websites too (like websites which host video clips or music composings) where users can select and view a video. a very nice example is the khan academy app, where separate videos are hosted for students to listen and learn.

Khanacademy screenshot

Let us take the example of Mashable.com, an extraordinary website with huge connections and overflowing articles. What does it need, you ask? "I want to conquer the world" would be its answer. Why would an otherwise fabulous website need an app for. But they do have one, for the obvious reasons mentioned in the previous article. The app readily transforms into a full blown article based website which obviously relies on your ability to make a selection and touch.

Mashable Screenshot

2B. Website Conversion Type App
Another type of app is the one using a website and converting into an app. with separate functionality for buttons, image viewings and feedback systems, throw in a couple of simple games and you've got yourself a real winner. One really good website converted into an app is NDTV.com. The website is one of the most popular and trusted sources of latest news. let us look at the app.

NDTV screenshot


Number image concepts

Reader Type App
Other than website redirection and functional apps, there is a third type of app not very common but is still present. The particular app downloads content from the website and reads it aloud with the help of an inbuilt reader software. 
The app is particularly useful for commuters who do not have enough time to read or are unable to read. and prefer to listen to the article being read aloud by someone while on a bus or train.


Number image concepts
Theme from your website
If your website is an insanely popular one with a lot of people backing it and a bucket load of fans just waiting for a piece of it. you can create a theme based app.
The theme consists of just duplicating the css style of the website into a theme pack which can be installed on any android or ios device. In short, your website structure and content is sooooo good that people are dying to replicate/copy it on their phones.

This was all about,
4 Concepts to Convert your Website into an App Mohitchar

May 21, 2013

How to create Water color effect in Photoshop

How to create Water color effect in Photoshop
Today, we welcome our author Himanshu Sharma. Himanshu, an expert in Photoshop here explains all about How to create a Water color effect in Photoshop. So sit back and enjoy this detailed tutorial in Himanshu's words.

In this tutorial on Photoshop, you will understand how to create watercolor effects using Photoshop and how to make a photo look similar to watercolor painting. This watercolor effect is suitable for photos which has rich colors with high contrast rather than minute details, since the effect can eradicate many of the minor details.  

It is very easy to create the water color effect by duplicating certain layers, application of certain filters and making use of certain layer blend modes. The entire thing just takes few minutes for completion and you can save it in different forms (.jpg or .gif) as you wish. This tutorial will explain how to simulate watercolor effect using some brushes in Photoshop.


Step 1 : First create a new document by clicking File-- New and also create new layer. Now fill the layer with white background and rename the layer as texture. Now choose Filter and click Filter-- Texture-- Texturizer. You can use Canvas for texture with eighty percent scaling.

Step 2 : Now open the image from file menu and add it to the document. You should delete the background of the image by using both Polygonal Lasso (L) and Path Tool (P) or with help of magic wand.

Step 3 : Now use the Selection Tool to select the layer in which the girl is there. Now Go to Image-- Adjustments and choose Levels. You should enhance the whites here and choose Image-- Adjustments-- Saturation/Hue and change the level of saturation to -65.

Step 4 : Now use the Water Color Filter present in Filter-- Artistic-- Watercolor. You can make use of below settings, Texture 1, Shadow Intensity 0 and Brush Detail 9.

Step 5 : After selecting the layer of the girl’s image, Chose Layer-- Layer Mask-- Reveal All. You can select black color and mask the girl’s body using the Brush Tool (B).

Step 6 : Now you can use the Watercolor brushes specifically designed for this purpose from Bittboxx website. Now choose a new layer and select the Brush Tool. Now you have to create new layer and use the Water Color brush tool with black color selected. You are designing the hair of the girl in water color style to give a realistic look. You can resize or rotate the layer after you finish the brushing.

Step 7 : Now choose Blending options from Layer Style. Change the Opacity of the Layer to 0 and chose Color Overlay option. You can Use Red color and select the blend mode as Multiply. You can also use the Opacity to be filled as 70 percent. For Blend Mode use Hard Light and fill with Purple Color with Angle set as twenty degrees, Distance as 4 pixels and Size as 12 pixels.

Step 8 : Now create another layer and use the Bittbox brush tool for designing a hair-style which looks creative and beautiful. Try to make certain paint brush strokes in the center of the screen and then rotate or resize the layer to fit it with rest of the picture. You should be able to generate a decent hair style as described in below picture.

Water color effect in Photoshop Sample


Step 9 : Now choose Blending options in Layer Styles and set Fill options as 0. Now select Color Overlay mode and Blend mode with Blue color selected and Opacity set as fifty percent. Now use Satin option for blending.

Step 10 : Now use the same Brush tool again and paint the hair with different color say Green. You can reduce the size and add more hair and rotate it if required. Again Go to Blending options and set Fill Options as 0. Now Choose Color Overly with Blend mode set as Multiply, Green Color chosen and Opacity set as 100 percent. Now use Satin for the image. You can use the settings as Dark green with blend mode as Darken.

Step 11 : Now repeat the process again with another Layer with different color. Then select the layer that has girl’s face and set blend mode as screen. Now you can make certain adjustments like adjusting the neck with regular brush and white color.

Step 12 : Now you can add some Title to the image. Use the same brushes and fill the text with different color. You can also use Filters like Sprayed Strokes form the Filters menu. You can change the appearance to water color by choosing Filter-- Artistic-- Water color. This will give a creative look the image.

Conclusion : Finally you have got the image of a girl which appears as it was painted with water color. This tutorial explains in a simple fashion of how to add watercolor effects to a photo and applying different blend modes. You should also remember that the artwork will appear original as if it was painted with natural water colors.

This is the entire procedure for creating Water Color effect in Photoshop. For knowing more about such graphics /design related information and tips, visit Design Graphica.

Apr 17, 2013

The Secret to Organisation in Blogging (From the Backrooms of codemakit.com)

The Secret to Organisation in Blogging (From the Backrooms of codemakit.com)
How do professional bloggers write such amazing articles every week? Some might even work on 5 to 10 articles at a time. Some work on just 2 to 3 really long articles with a lot of information locked up in a capsule. So the obvious question pops up, how can a blogger, manage to work on 10 blog posts at a time.

A professional blogger can work on up to 10 blog posts at a time. The multitasking allows them time and space to think about ideas both in quantity and in quality.

The average number is 8 however. Organizing is the key to better and efficient content creation. Once you organize everything you can hold large number of articles at a time. This herculean task is obviously difficult for any blogger who doesn't organize. Now organizing your blog posts is just like organizing a research, you need to divide information into chunks so that you can better manage it.

The Root Folder

Let’s have a look at a typical case of a windows blogger (i.e. at the backrooms of codemakit.com). The main blog folder is divided into 3 headers.
  1. Blog Idea – It contains reading material, pdfs and pictures to help you understand the topics you’re working on.
  2. Blog Pictures – Contains templates for new images, incomplete image projects etc.
  3. New Articles – Contains all the new articles, that you’re writing, updating or written.

The Backrooms of codemakit.com

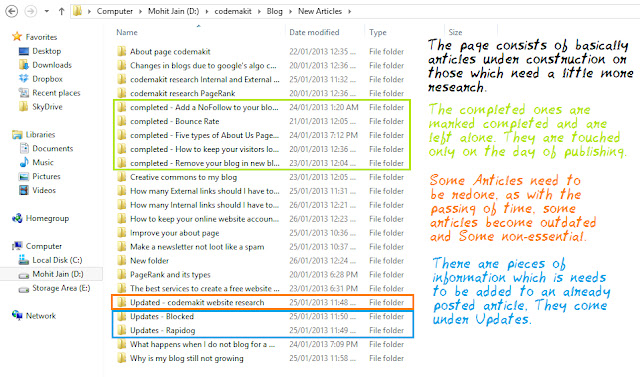
As is evident from the screenshot in the New Articles folder, the Posts Title is usually thought-of before the article is written and the complete post with images, article snippets, source articles and pages from other websites is then stored in the particular folder.

The Details

The folder system of storing the articles is presumably better and much more organized, so it removes the searching time and avoids the hassle.

The Backrooms of codemakit.com

Now the complete blog folder (i.e. main folder) is filled with such individual folders containing one article each along with the source media. The folders can then be divided into four parts.
  1. Articles under construction – The majority of articles are under construction and most articles are either incomplete as per content or images/video or those which need more research.
  2. Completed - The articles which have been completed in every sense in the author’s view. They are touched only on the day of publishing.
  3. Articles to be Updated – It contains the articles which has already been posted long time ago but now needs a major remodeling, as with the passing of time, some articles become outdated and Some non-essential.
  4. Update – There are pieces of information which is needs to be added to an already posted article. It contains updated media (i.e. an image to spice up the article or a video to make it more interesting). This update will not contain the article as a whole but just the media to be added.
This helped you in
The Secret to Organisation in Blogging MohitChar

Apr 3, 2013

Create another Gadget space for your blogger blog

Create another Gadget space for your blogger blog front
How many times have you wanted another gadget space on your blog? You have a third party code which you want to incorporate in your blog but you did not find space to add it. So what will you do? Simple solution to this problem is provided here. 

You always have some space in the sidebar, which keeps on increasing when you use one. But what about another large footer banner space? Or a large header banner space? Or even a large banner space in your body space to include your author bio? This is where things get interesting.

Step 1: Go to your blogger dashboard and click on layout tab. Now click on edit HTML and click on the ‘Expand Widget templates’ Option in the pop up.
  • Press Ctr+f and find the following code in the HTML.
           <b:section class='art-Header' id='header' maxwidgets='1' showaddelement='no'>        
  • Replace maxwidgets value 1 by any higher number. You may also leave the quotation marks empty to have an unlimited number of widgets available at your disposal.
  • Also replace The showaddelement value from ‘no’ to ‘yes’
Step 2: Now repeat the above three steps for every piece of code given above.
In the page layout tab, you will find a large number of 'Add a Gadget' boxes at nearly every tab.

Note. The showaddelement controls the situation when you use an add a gadget box and another one still remains empty. Putting the value as ‘yes’ will ensure this behavior and a ‘no’ will make sure you cannot add another gadget in the particular location after one has been used.

This helped you,
Create another Gadget space for your blogger blog mohitchar

Mar 15, 2013

Why is my blog still not growing?


Why is my blog still not growing? FrontIt has been over a year since you started blogging seriously, you’ve written scores of articles and blog posts. According to you, as you keep on writing articles the content and the pages on your blog will increase leading to more places visitors will be attracted to. So, as a cumulative effect, you should be getting more and more visitors every day. But, none of the things are happening and you find that however hard you’re trying nothing seems to be enough.

At this point of time, bloggers often second guess their own blogging techniques or even interests. ‘Maybe I’m not good enough.’ Or ‘Maybe, I should stop writing on such and such topics’ or ‘I think I’m losing my charm, better move on.’

Now you might have tried all sorts of techniques to technically improve your blog. Like:

  1. Making your blog, visitor centric (level1, level2, level3)
  2. SEO tactics
  3. Keyword researches

Now if you’ve taken all these precautions, and still not getting results, This article will help.

The only thing you’ve forgotten until now is the analytics part of a blog. Small business owners and amateur bloggers use web analytics to test their website but the only thing which attracts their attention is the number of visitors coming on their websites. Some even go to the extent of finding the source of visitors (country) or web browser. But that is not enough, in a cut throat competition of ours when blogs miss higher rankings by just a few points, it is very important that you do something better than the others and something more than the others.


Is your content curing insomnia?

Why is my blog still not growing? else
Blogging atmosphere is all about helping people in your own language. As I have rightly said before, a typical blog is no place for lengthy formal discussions. One must find it in himself to avoid boring people. When a person reads an article on your blog and finds it utterly uninteresting, The same person would refrain from browsing through other articles on your blog. This would lead to visitor bouncing, which means visitor not going through your articles once he has gotten inside. If this process is applied for a large number of visitors it is visitor bounce rate, which means the number of visitors moving out of your website once he/she has read a particular article on your website. You can try to increase your bounce rate and everything in the books from SEO to SERP, then try something fundamental like your content in the visitor’s perspective.

Trust issues, anyone?

Your readers might have some trust issues if they do not know who’s writing the article or who’s teaching them. Usually people do not have the time to check out the author of the content and they just believe whatever is written, just because they have to as they’re busy and just came here for a quick fix. But not all people are like that. Many of the visitors who come to your webpage might have time on their hands and are just browsing for fun. Now listen, such people should be seen by you as gold encrusted diamond hatching hens that poop silver. Why? Because it is those people who have the time to comment increasing user interface with the website. It is those people who have time to check you out on the social networks like facebook, twitter or foursquare. They are the most loyal visitors because they would bookmark your website if they find it useful; they would send friend requests to you if they are interested by way of your writing. So try looping in such visitors.
What should you do to handle their trust issues? Create an ‘about page’, many bloggers are shy and refrain from writing about themselves. But in this world of cutthroat competition you must write about yourself. This will help users know about you and this will add value to your product. Visit this page to know how to create an awesome about page.

Banalities

Why is my blog still not growing? whyA widely read blogger is one who has taken the pains to research and present his findings in a marketable way. But there is one thing that is innate in every successful blogger, originality. Such blogger just reads some material at some post, find it interesting, copies it to his blogging platform and starts changing the language, hoping it would lead to an awesome blog post. Such techniques do work but only up to a limit. You will receive visitors on the blog, maybe many at some posts because of the change in the keywords of the particular URL. But it all stops right in front of a line before you can say ‘I am a successful blogger!’, Google will touchup its algorithm and you’ll be back from where you started. Create new content, something unique, something original, but never cross your content policies.

Smooth posting

The following Idea was completely ignored by me while writing this article until I came across Rahul Kuntala’s post on why your blog is not growing argued that erratic posting frequency also leads to a halt in the progress of the blog. When a person posts two articles a week, he must maintain the speed and not go for 4 articles in the next week. Some bloggers have discussed an urge to post something at some time which they cannot suppress. A very nice trick to this is by using a scheduler (i.e. schedule blog posts in blogger and wordpress). To know when should you post an article, read here.

No Comments

How many times have you seen actors and actresses mouthing ‘No Comments’ to the eager reporters and papparazi swarming in their direction. What do you feel at that time? Obviously down, What kind of crap is he filled with, walking around with that big attitude of his? The exact opposite reaction is of visitors coming to your site finding no comments. The first impressions are as follows :

  1. The post is not good enough so people are not commenting
  2. The Blog is not good enough so people are not commenting
  3. The Blog does not get enough visitors so people are not commenting
  4. The Blog administrator must be stingy, moderating the comments very closely

Jacob Klein at SEOmoz explains clearly how you can get more blog comments,

This answered your question
Why is my blog still not growing? MohitChar

Mar 13, 2013

Techniques to store your passwords safely


Techniques to store your passwords safelyRecently 450,000 user account passwords on Yahoo hacked in addition to 6 million LinkedIn accounts and the 32 million on RockYou.com

According to pc world,  A professional hacker can access an account in one second leading to a total of 17 minutes to break into 1000 accounts.

So what do you do to keep your most prized possessions away from those criminals? A budding enthusiast will always have a problem lined up after the other. One such problem is the storage and protection of passwords for your online user accounts. To achieve this feat, one must create a system in which the passwords are stored properly and safely.

For Storage of Passwords

Since your usernames and passwords are the key to unlocking your account information and practically everything about yourself, You first need to create a system for the storage of the usernames and passwords so that they do not just lie around for everyone to watch and read.

Never write Usernames and Passwords in small chits or pieces of paper. There are two reasons: First, you then have to keep track of each and every chit at your home/office and Second, The chits are open to everyone for use.

For the hardware lovers,

Those who think the best way to store confidential information is on paper. These people are cautious, and have utmost confidence in the hacker community, why because they are sure that one day will come when each and every account of theirs would be accessed easily by a bearded, spectacled guy sitting with a laptop. For such cautious paper-philiates only job left is to print out a template on an A4 sized paper. Once printed they can then fill-up the details of carious mail and online accounts through a pen and then keep it in a locked drawer of yours or a small safe.

For the software lovers, 

There are two options available. First to create your own system, i.e. to create an excel file or a Microsoft access file with the below template in use. Second to rely on another predefined system, i.e. a password manager (online or offline).

Use of an Excel file
An excel file is one of the most easy and most trusted ways of keeping your passwords safe (other than that of the paper method). Its advantages are the ease of use and the safety.

Techniques to store your passwords safely

The excel file can be created based on the above template. Once a template has been created, you then just have to enter the website name, your username and the password for the website.

Techniques to store your passwords safely

Now next important step is to secure the complete document. It can be done in the following ways.

  1. Firstly, encrypt the document
  2. Secondly, set a password to open the document
  3. Thirdly, set a password for modifying the document
  4. Fourthly, restrict access to the document
password

Use of a password manager
Many tech savvy people rely on password managers who claim to keep their user’s passwords safe. Some might even go to the extent of using an online password manager. In my experience, password managers if free are of absolutely no use. The companies cannot afford the kind of security needed to ward away hackers with users swarming with free accounts. But paid ones can afford and you will stand better chances with them. Some of the advantages of a password manager are:

  1. Provides a nice template to help you store your passwords in a more effective manner
  2. Help you create stronger and healthier passwords
  3. Ease of use
  4. Relieves you of the hassle of remembering the passwords
  5. Simultaneous updation of passwords
Though I would not recommend it, but for busy bodies, here are some of the password managers

Related Reading,

You can store your passwords safely, but can you prevent yourself from unknowingly giving away your passwords?

Though you know the techniques to store your passwords safely, are you aware of other methods to say safe online?

Also read, everything about phishers and phishing. Learn, how they trick you into giving away your information.

These were the,
Techniques to store your passwords safely mohitchar

Feb 15, 2013

4 Sureshot Ways of Improving your Bounce Rate


4 Sureshot Ways of Improving your Bounce Rate FrontFirst of all, what is bounce? In the language of web development, bounce refers to a situation when a visitor comes or lands on your webpage reads/glances at your content, closes the webpage and supposedly moves over to another webpage. 

Now let me tell you, you sincerely do not want people bouncing off your website. This would refute all your plans of making money through ads; Worse, the posts you've written before will go to vain because your potential high valued visitor has flown away and so all the toiling you've done in inserting internal links in your page will go to vain.

Stay Stay Stay,

One of the best ways of improving bounce rate of any blog is by increasing the amount of time a visitor stays on the webpage. When the visitor stays longer he has the incentive to look at the links laid out by the developer and not close the tab and look for something else. Visit blogs and learn how to keep your visitors longer at your website.

Links anyone?

In the previous Para we saw how visitors can be hooked to the site by using internal links. But what are the ways by which you can show internal links on your blogs?
  1. Blogger blogs usually have a popular posts widget in them, which is something you can use to your advantage. Wordpress blogs have awesome plugins which can also be utilized.
  2. It would help your visitors to know what you’ve actually done during the previous months. So, some bloggers even include an archive section which might contain links month wise or year wise.
  3. Labels do help your visitors to look for similar content written by the author on the subject. Another attraction for the visitors to gain knowledge and the webmaster to gain loyalty.
  4. Not all articles are one pagers some have to be written in series, like for an example take a look at the following series by codemakit. Good news for Wordpress users, there is an article series plugin for the same.

The good old content

Content is the king, nearly every blogger would agree. Codemakit has talked a lot about useful content and content writing tips, so that would not be discussed here. But since the point is worth noting, so it is here.

Keywords man!!!

Whenever a visitor see your website on the Google search engine listings for a particular search item, he clicks on your link and enters with the hopes that you’re giving what he needs. But, if you have not reviewed your keywords, then your website is plunging in the doom, no matter what you do. When a visitor fails to achieve his quest from your website, he is bound to leave.

This was about,
4 Sureshot Ways of Improving your Bounce Rate MohitChar

Feb 12, 2013

Remove your blog in the new blogger


Remove your blog in the new blogger Front
The following article explains how and when a blog is removed.
A time comes in many a blogger’s life when he has been over ambitious, when he has taken more projects than necessary, started more blogs than he could have handled and tried writing more than his capacity. But, then one day it strikes him, it had been wrong all over. Then he tries to amends his mistakes by leaving the particular blog and diverting his attention towards the mainstream blog, but all in vain. He is still reminded about how ambitious the earlier project was and how popular was it going to be. Finally one day it falls on him, what if he could delete the blog? So then he moves on to delete it.

There are five reasons why blogs are deleted, yours must be among these:
  1. Blog is blacklisted
  2. Blogger not interested
  3. Blog unable to garner enough earnings
  4. Blog interfering with mainstream work of the blogger
  5. Blog user finding it difficult to understand the blogging process

So how do you delete your blogger blog?
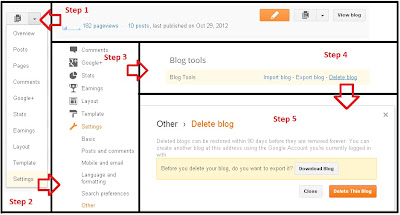
  • Step 1: Determine the blog you are going to remove
  • Step 2: Now go to Blogger dashboard, Click on the pull down menu and Go to Settings
  • Step 3: In the settings tab, Click on other
  • Step 4: On the top you will see a portion of the screen titled ‘blog tools’. It is here when you can import export or delete your blog.
  • Step 5: The new and improved blogger allows the user to download the entire blog, for future use. Also the new blogger will retain the particular blog in its database in case the user changes his mind for 90days. Also blogger allows its users to create another blog in the name of the particular blog i.e. the URL of the deleted blog will be available to others.

Here is a detailed walk-through chart to help you in the process.

walk-through chart


This was about,
Remove your blog in the new blogger MohitCHar

Feb 4, 2013

Make your Visitors stay Longer at your website

Make your Visitors stay Longer at your website
Ever wondered what makes people stick to your website. What keeps them attached and prevents them from leaving your website? This article outlines all the working methods there are, to keep your visitors longer on your website.

Any blog to impart its full impact to its readers, there are 3 things to keep in mind:

The Ease of finding the blog and its links,
The Time taken by the visitors to go through your site and
The Ability to find what they’re looking for without hassle.

The effectiveness of your blog or its article is jeopardized considerably when visitors do not stay at your website. How? Let’s have a look.


How?

When visitors do not stay longer, they will not go through your precious data and your conclusions and even your recommendations. This will increase your bounce rate, (Though it is not the most efficient way of determining a blog's fame). They will not have the time to find what they’re looking for and so they will not try out the internal and external links you've just placed.

Not only this, the visitors will not click on the ads you've placed in hopes of gaining some monetary value from your blog. The repercussion is even worse for commercial websites who thrive on the so called ‘call to action’, a term which denotes an action of the visitor like buying something or adding something to cart or even downloading.

So what should you do to make your visitors remain on your website longer? What should you do to keep your visitors interested in your webpage so that they hover around and not just bounce away? Who knows you might even double your visitors.

Remove Unwanted Page Links

Though it is important to link other websites regularly on your website and external links are one of the three important things, a website needs to get into top 500. But, Just as 'excess of anything is bad', keeping too many external links in your blog or webpage, act as incentives and opportunities for the people to move on to other websites.

This leads to lower visitor time and lower ‘call to actions’. Instead, write more and link your own posts and Webpages in your landing page.

Loosen Yourself

When writing a blog, you must understand that it’s just an article to be published in your blog and not a research journal with proper punctuation and extraordinarily formal ‘grey’ language to be published in a famous journal. Just loosen up a bit, use your own words and emotions in it. When people read your article, it will open up like someone is talking to them and we all like talking better than reading.

Your way of talking and writing combined will captivate your readers and compel them to stick to your article till the end. When you create an emotional connection with your readers, they will try to go to your facebook or twitter page.

They will subscribe to your blog feed and some will even comment on what they thought about the article and how it could be improved.

Watching is Believing

We all know that listening is better than reading, but what is better than listening? The only thing better than listening is seeing it with your own eyes. What is better than a video to indulge 2 of your most trusted senses to work?

When people click on the translucent triangle they’re transferred to a world of information, where everything is moving. The users will not have to browse through your article searching for points of intersection with their interests. So, make a YouTube account, make and add videos on the topic of interest and just embed the video in the blog post.

Seeing is Believing

Now this portion is in conjunction with the seeing is believing part, Videos are nice but they take up a lot of time from the blogger. What should you do when you do not have enough time to make a nice video? You make up images, colorful image do help in captivating visitors to see what’s inside.

The title must be large or in uppercase, it should not be misleading. The users must get what they came here after seeing your title. Subheadings keep it simple and allows reader to jump from one portion of your text to other without having to search for it. This lowers the bounce rates i.e. user leaving after finding the txt too boring.

Altius Fortius Citius

Your page must load with celerity; the loading time for any website is a crucial factor in determining if the reader wants to stay there or not. It forms the first impression of your website in the eyes of the visitor. Analysts claim that user has made his mind within first 3 seconds after clicking a link, whether he is willing to make the effort to dig out information from your website.

A higher page load time will lead to frustration and loss of interest. If you cannot make your webpages faster, just ensure you've made some changes to your homepage to make it load faster.

These were the
Time Tested Methods of Keeping Your Visitors Longer MohitChar

Jan 28, 2013

Add a NoFollow to your Blog comments

Add a NoFollow to your Blog comments Front
Learn about NoFollow and the process of adding it to your blogger blog’s comments. Also learn about link and content farmers and their goals.

A time comes when you find people (spammers actually) clamoring up your blog posting strange and weird comments to your blogs. It’s no time when you realize that it is depreciating your blog’s value. Also you can read an article at HubSpot which says that while crawling search, engines consider the links in the comments section too and so if your blog has weird comments with crappy links hidden in a clandestine fashion, then at some point of time your blog will be considered near crap by the search engines. So you decide to remove the comments.

Now it’s been time when you’ve started removing comments or moderating them. But it’s a tedious process anyway. So what’s the solution?

Content Or Link Farmers

Obviously the ‘NoFollow’ attribute. Google has always adhered to its policies diligently  A new concept comes here which must be explained. A particular group of people who just post crappy content with or without links on different blogs and websites so that they can harness link juice and keyword are known as content or link farmers. The complete practice is illegal and can lead to ban.

Why do these people do what they do?

There are some reasons,

  1. When a website has its link on a website with a PageRank higher that their’s like yours for example, Then in the search Engine’s eyes, you are recommending the website to the search engine. And if the website doesn’t turn out good or becomes a 404 error, then it is bad for you and your website. Some spammers are actually your own competitors trying to wear you down so that your website gets penalized and looses visitors to the competitor.
  2. Also when you’re recommending a website by hosting  a link on your website, Why let others take the advantage of your efforts.
  3. In the keywords perspective, certain blogs have claimed a decrease of more than 50% traffic to a website/blog due to spammer comments. The reason being unnatural and unrelated comments bring altogether weird keywords to your blog. Your main keywords set aside for your website will have no effect.

The HTML tag, known as NoFollow tells the search engine robots that they should not consider that link in their calculations. So you need not worry about recommending the site as you’re not and so you will not be penalized.

Process

Here is a step by step process of applying a NoFollow attribute to your blogger blog.

1. Go to Blogger-; Design - Edit HTML
2. Click "Expand Widget Templates" box
3. Now find the following piece of code using Ctr+f

<a class='comment-link'>
<a expr:href='data:comment.authorUrl'>

4. After the at the end just add rel=”nofollow”, so at the end of process it would look like

<a class='comment-link' rel="nofollow"
<a expr:href='data:comment.authorUrl' rel='nofollow'>

5. Click save your template.

Now that you’ve completed the procedure, you need not worry any more about the search engine implications due to weird and crappy comments with links in your blog.

Now you can even check if you've completed the procedure successfully using the firefox addon known as nodofollow. It performs the seemingly impossible work of finding out which parts of a webpage has a NoFollow attribute stuck on it. Here is a screenshot of the add-on on codemakit itself. The highlighted links in blue are dofollow links. But the highlighted links in red are nofollow links. As you can see yourself, the comments section are all in red thereby freeing you from any liability and penalty.

Add a NoFollow to your Blog comments examples

This was a walk-through on the process to
Add a NoFollow to your Blog comments MohitChar

Jan 22, 2013

Registering a Domain with godaddy.com for a Blogspot blog

Registering a Domain with godaddy.com for a Blogspot blog Front
The following post is for those who have just bought a domain or is thinking of buying a domain from godaddy.com and would like to host their blogger blog on that domain. This post is just a walk through.

The complete article is broken into six points,
1. Buying a domain
2. Pointing Goddady.com towards Blogger
3. Note on the process
4. Pointing Blogger towards Godaddy
5. What will happen
6. Note on the process

Buying a Domain

You need to create an account in Godaddy.com
  1. The signup button is just on the top left corner of the website
  2. After completing the formalities and registering you will be provided a customer code. In future, you need to sign in using this customer code and your password only.
  3. Once this is done, just type-in your desired domain name and press enter. If it is available, then well and good; if it’s not then you’ll have to find another combination of your domain name and the suffixes like .org, .com, .net etc.
  4. Once that is done, you will have to check out from the location towards the billing area.

Pointing from Godaddy towards blogger

Now that your billing is done and you have a brand new domain etched out under your name, you will have to point the domain towards blogger or google. In Godaddy.com this feat is achieved from the zone file records. The following steps show you how to reach the zone file records:

Pointing from Godaddy towards blogger
  1. First log in to your account manager from the top left portion of your screen
  2. Then click on domains tab, the tab will open and your selected domain will be visible. Click launch
  3. At this page go to tools menu and select DNS Manager from the drop down list.
  4. Now you’ve reached the DNS Dashboard
    Now you’ve reached the DNS Dashboard
  5. Notice the top left navigation bar, Under the Home tab you have 3 settings, Dashboard, Zone File Editor and Advanced settings.
    Dashboard, Zone File Editor and Advanced settings.
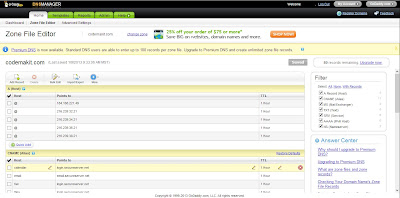
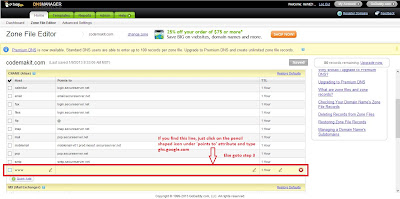
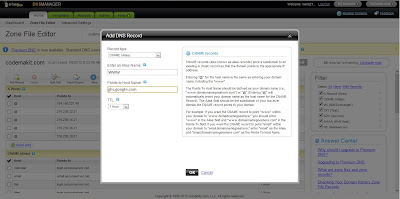
  6. Click on Zone File editor and you will be greeted with the following page. In this zone file editor, find the CNAME attribute, for Godaddy look for the ‘host name’ as ‘www’. Now, edit the ‘points to’ parameter as ‘ghs.google.com’
    Click on Zone File editor
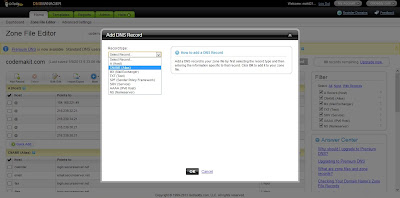
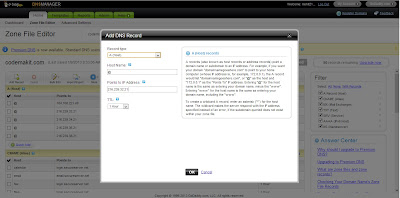
  7. Now find the ‘A host’ attribute, For ‘A Host’ you need to create 4 different records. Click on ‘Add Record’ button located on the top left potion of the page. Now for ‘host Name’ just type ‘@’.
  8. For the ‘points to IP address’ enter the following IP address for Google ‘216.239.32.21’. The same procedure has to be repeated for 3 more times with ‘host Name’ as ‘@’ and the IP addresses as ‘216.239.34.21’ ‘216.239.36.21’ ‘216.239.38.21’.
‘points to IP address’

Note Goddady.com towards Blogger

Now the obvious question which comes to everybody’s mind right now is what are Zone files and Zone records. When you buy a domain name from any vendor, be it godaddy or google; Every single domain will have a zone file and each zone file will have zone records. Godaddy supports upto 20 zone records. Now these zone records contains the domain name server information which links the particular domain name (your domain name) to the specific IP address.
Regarding Zone records, the above discussed CNAME is an alias for a host, using it you can have more than one DNS name for a host. If you talk about ‘A Host’ it maps the IP address to the host name.

Pointing from Blogger to Godaddy

Now that you have completed the formalities from Godaddy’s end, Its time to complete the bridge from blogger’s end also. 

  1. Now, to update your Blogger settings First thing you need to do is wait for atleast an hour before the changes made by you in the DNS take place. Usually the changes are reflected within an hour.
  2. Now Go to the settings tab in your blogger dashboard,Click on ‘Other’.
  3. Now in the publishing subsection you will see a link to ‘add a custom domain’.
  4. Click on "Switch to advanced settings."After the http you need to enter the domain name you just registered on godaddy.
  5. Now once you’ve entered the complete URL and clicked on the ‘redirect’ option, you need to wait again. 
Enter the Complete URL


Usually the change is observed within half an hour but in some cases it might take even upto 24 hours. If it still isn’t working, then you need to contact the representatives at godaddy.com

What will happen?
Once all the steps are complete, these things will happen,
  • You will always see the blogname.com instead of blogname.blogspot.com until your domain expires
  • All the links that once pointed to blogname.blogspot.com will point to blogname.com

Note Goddady.com towards Blogger

Before I conclude there is another question, What is this missing files host?
There are times in huge websites when certain resources cannot load properly, for example images or videos. So what does the website developer do when he’she is confronted with such a situation. He creates a backup of the resources and instructs the website to fetch the resources from the backup if the original returns nothing. Similarly if you have a missing files host and you are trying to fetch www.blogname.com/image.jpg and you do not get the image you can use the host and get the files from www3.blogname.com/image.jpg. But for blogger users this might come as a shock to some that google’s blogger has discontinued the use of File Transfer Protocol (FTP) on its websites after the first of may 2010.

This gave you a walkthough on
Registering a Domain with godaddy.com for a Blogspot blog MohitChar