
The following post is for those who have just bought a domain or is thinking of buying a domain from godaddy.com and would like to host their blogger blog on that domain. This post is just a walk through.
The complete article is broken into six points,
1. Buying a domain2. Pointing Goddady.com towards Blogger
3. Note on the process
4. Pointing Blogger towards Godaddy
5. What will happen
6. Note on the process
Buying a Domain
You need to create an account in Godaddy.com
- The signup button is just on the top left corner of the website
- After completing the formalities and registering you will be provided a customer code. In future, you need to sign in using this customer code and your password only.
- Once this is done, just type-in your desired domain name and press enter. If it is available, then well and good; if it’s not then you’ll have to find another combination of your domain name and the suffixes like .org, .com, .net etc.
- Once that is done, you will have to check out from the location towards the billing area.
Pointing from Godaddy towards blogger
Now that your billing is done and you have a brand new domain etched out under your name, you will have to point the domain towards blogger or google. In Godaddy.com this feat is achieved from the zone file records. The following steps show you how to reach the zone file records:
- First log in to your account manager from the top left portion of your screen
- Then click on domains tab, the tab will open and your selected domain will be visible. Click launch
- At this page go to tools menu and select DNS Manager from the drop down list.
- Now you’ve reached the DNS Dashboard
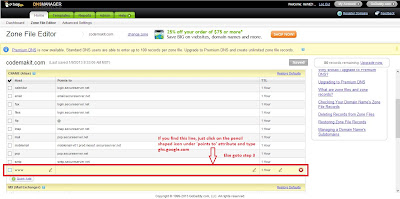
- Notice the top left navigation bar, Under the Home tab you have 3 settings, Dashboard, Zone File Editor and Advanced settings.
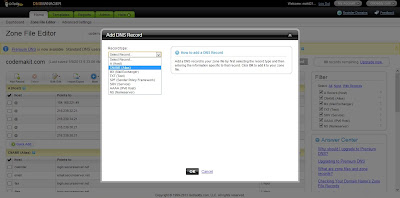
- Click on Zone File editor and you will be greeted with the following page. In this zone file editor, find the CNAME attribute, for Godaddy look for the ‘host name’ as ‘www’. Now, edit the ‘points to’ parameter as ‘ghs.google.com’
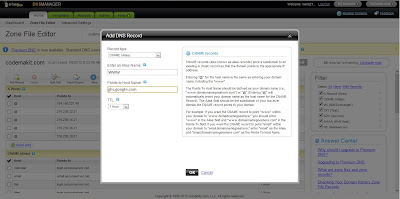
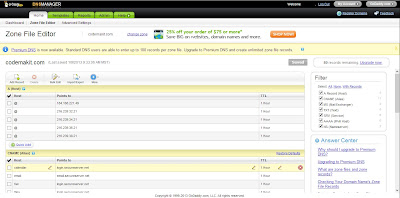
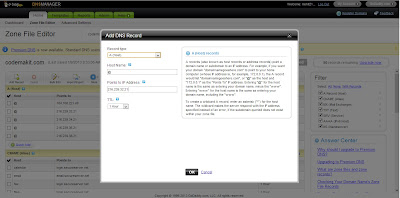
- Now find the ‘A host’ attribute, For ‘A Host’ you need to create 4 different records. Click on ‘Add Record’ button located on the top left potion of the page. Now for ‘host Name’ just type ‘@’.
- For the ‘points to IP address’ enter the following IP address for Google ‘216.239.32.21’. The same procedure has to be repeated for 3 more times with ‘host Name’ as ‘@’ and the IP addresses as ‘216.239.34.21’ ‘216.239.36.21’ ‘216.239.38.21’.
Note Goddady.com towards Blogger
Now the obvious question which comes to everybody’s mind right now is what are Zone files and Zone records. When you buy a domain name from any vendor, be it godaddy or google; Every single domain will have a zone file and each zone file will have zone records. Godaddy supports upto 20 zone records. Now these zone records contains the domain name server information which links the particular domain name (your domain name) to the specific IP address.
Regarding Zone records, the above discussed CNAME is an alias for a host, using it you can have more than one DNS name for a host. If you talk about ‘A Host’ it maps the IP address to the host name.
Pointing from Blogger to Godaddy
Now that you have completed the formalities from Godaddy’s end, Its time to complete the bridge from blogger’s end also.
- Now, to update your Blogger settings First thing you need to do is wait for atleast an hour before the changes made by you in the DNS take place. Usually the changes are reflected within an hour.
- Now Go to the settings tab in your blogger dashboard,Click on ‘Other’.
- Now in the publishing subsection you will see a link to ‘add a custom domain’.
- Click on "Switch to advanced settings."After the http you need to enter the domain name you just registered on godaddy.
- Now once you’ve entered the complete URL and clicked on the ‘redirect’ option, you need to wait again.
Usually the change is observed within half an hour but in some cases it might take even upto 24 hours. If it still isn’t working, then you need to contact the representatives at godaddy.com
What will happen?
Once all the steps are complete, these things will happen,
- You will always see the blogname.com instead of blogname.blogspot.com until your domain expires
- All the links that once pointed to blogname.blogspot.com will point to blogname.com
Note Goddady.com towards Blogger
Before I conclude there is another question, What is this missing files host?
There are times in huge websites when certain resources cannot load properly, for example images or videos. So what does the website developer do when he’she is confronted with such a situation. He creates a backup of the resources and instructs the website to fetch the resources from the backup if the original returns nothing. Similarly if you have a missing files host and you are trying to fetch www.blogname.com/image.jpg and you do not get the image you can use the host and get the files from www3.blogname.com/image.jpg. But for blogger users this might come as a shock to some that google’s blogger has discontinued the use of File Transfer Protocol (FTP) on its websites after the first of may 2010.
This gave you a walkthough on



.png)

.png)